Category Archives: New Construction

Setting Up an Art Studio in Your Abandoned Attic

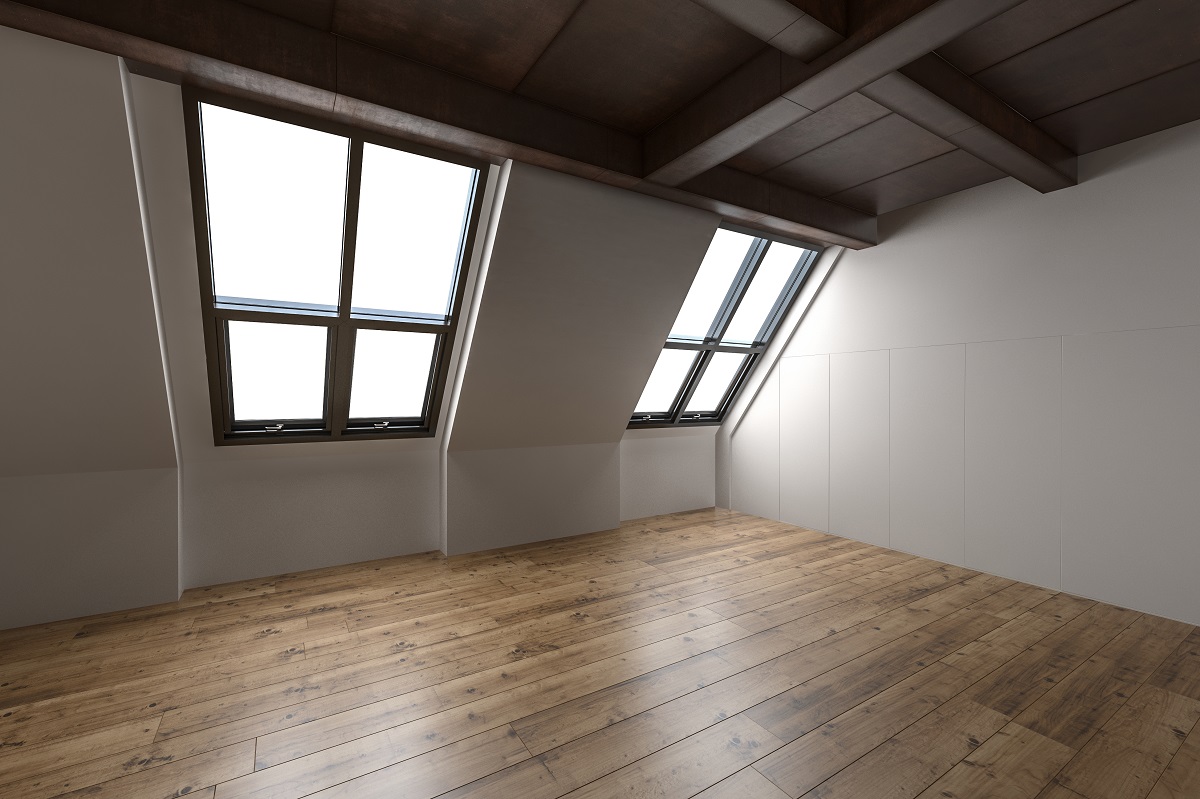
If you devote time to art as a hobby or do it for a living in Kansas City, you could set up an art studio in your attic. Instead of storing old furniture and holiday décor in your attic or letting it gather dust, get more out of it by transforming the often overlooked room into another livable, working space.

Its strategic place allows you to do your paintings, sculptures, or any other form of art you do with complete focus. You’ll especially need the solitude and tranquility of the attic when you have kids; they couldn’t just barge in while you’re in the middle of your work.

But before you move your art tools and supplies, you’ll need to convert the attic into a suitable art studio at home. If the space has been abandoned for a long while, it will need more than a usual clean up. It will need new insulation, especially when you’ve been noticing an increase in your heating bill. Or maybe you’ve been wearing bulky clothing indoors whenever Kansas temperatures dip. It may be time to switch to a more thermal efficient insulation, like Blown-in-Blanket System or BIBS.

Whether you’re a working artist or a hobbyist, the space has to be cleaned thoroughly and prepared to meet your requirements. If you want the studio to double as a gallery, for example, you’ll need to make sure it can accommodate visitors.

Here are 11 steps that will help you transform your attic:

attic

1. Check If Your Attic Meets Local Building Codes

When transforming your abandoned or messy attic, the space should adhere to the same building requirements as the other rooms in your house. Your planned attic conversion should satisfy the following local regulations:

  • The vertical clearance of at least half of your attic’s floor space should be 7 feet or more
  • The attic should have a minimum of 70 square feet of space
  • It must be accessible by a permanent, full-size staircase (ladders and pull-down staircases won’t do)
  • The space should have easily accessible exits

The purpose of meeting these requirements is to avoid strangely configured (and potentially hazardous) spaces. If you construct an art studio that doesn’t conform to space regulations, you could end up creating area room that’s difficult to access during emergencies.

2. Determine If You Need a Building Permit

Get in touch with the permitting office in your local area and check if a permit for attic conversion is required. Building permits are usually necessary when your attic conversion project changes the structure of your house. They’re also required if you’re installing ventilation and electrical wiring in your art studio.

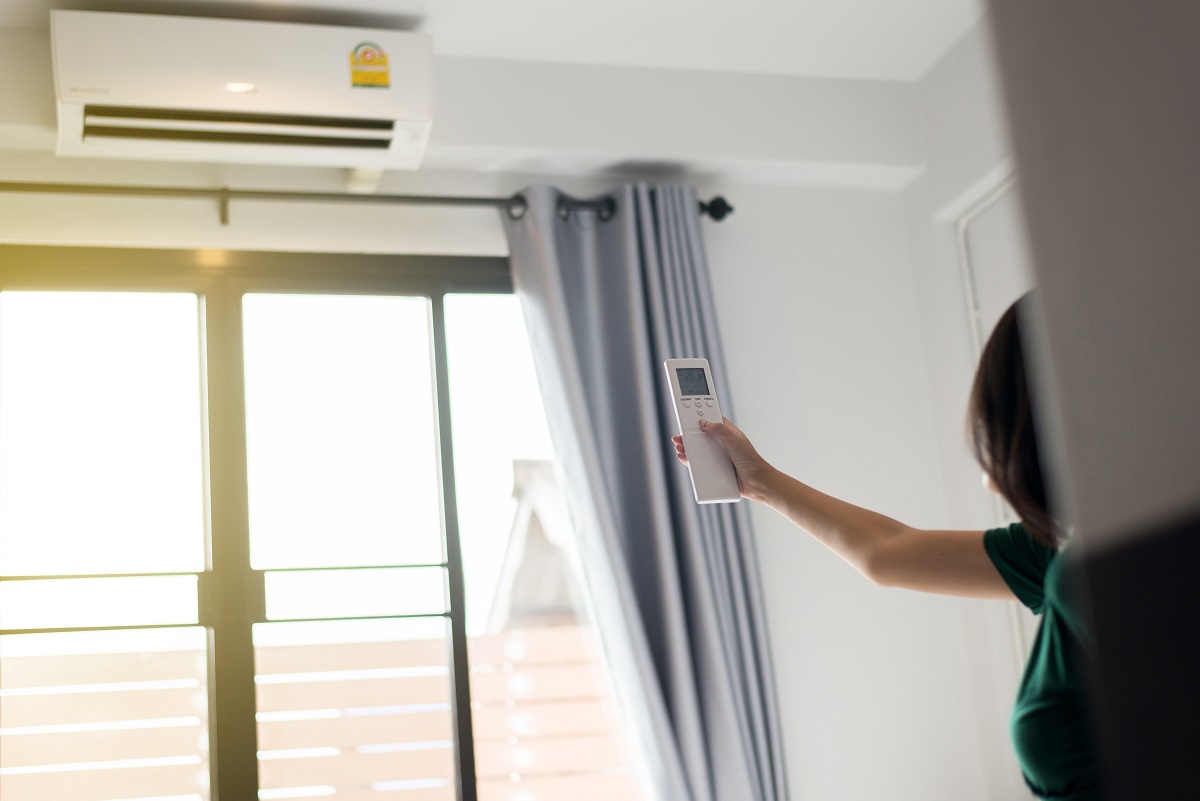
3. Consider Your Attic’s Heating and Ventilation Needs

If your future art studio lacks ductwork, figure out if your home’s heating and cooling system could properly heat or cool your attic.

If installing a new HVAC system or ductwork is a little beyond your budget, don’t worry. You could add cost-efficient heating and cooling units, such as mini-split air conditioning systems and electric baseboard heaters.

4. Look at the Cost of Finishing an Attic

According to Remodeling Calculator, the average cost of converting an attic into a living space is from $40,000 to $50,000. This cost already includes the installation or addition of permanent stairs, a new HVAC system, vents and ducts, and electrical wiring.

Although finishing an attic is an expensive home remodeling project, it offers a fantastic return on investment (ROI). Remodeling Calculator says that homeowners could recoup up to 62 percent of their investment when they transform their attic. If you shelled out $60,000 to give your attic a makeover, for example, you’ll likely get an ROI anywhere from $32,000 to $39,000.

5. Get Rid of the Junk in Your Attic

If you’re going to convert this part of your home into an art studio, you’ll need to dispose of the old junk lying around in that area. Store your off-season clothes and holiday décor to other parts of your home. The old furniture, unused home accessories, and various knick-knacks could be sold off when you hold a garage sale.

Use this time of clearing your attic to unburden your home of possessions you no longer use. You’ll not only add space but also earn a few bucks to spend toward renovating your attic.

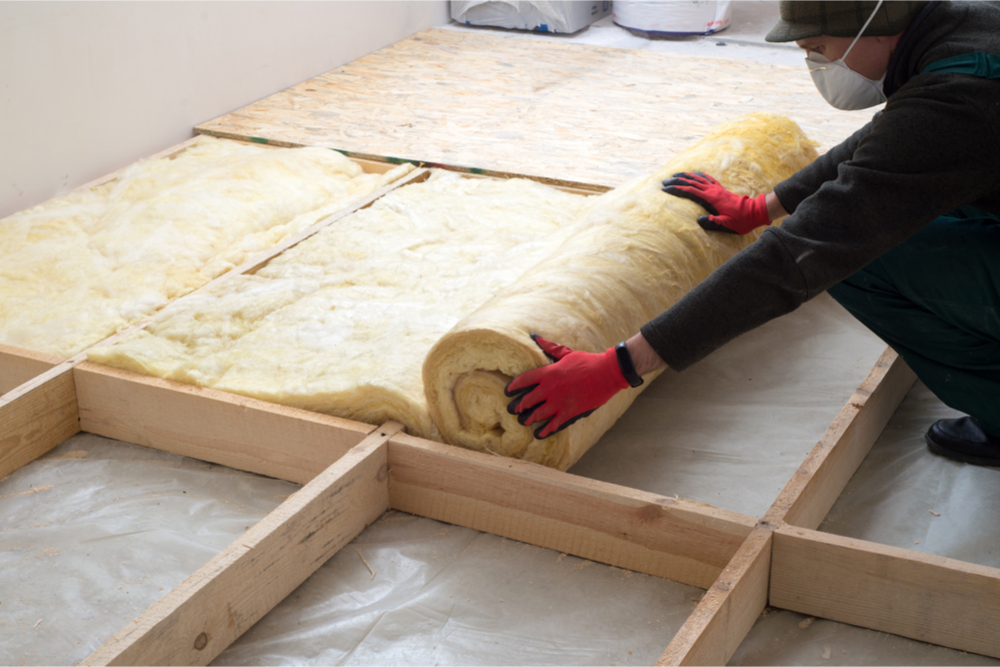
6. Install New Insulation in Your Attic

The existing insulation material in your attic may not be appropriate for your new art studio. If this is the case, you’ll need to get rid of the old insulation and replace it with a better one.

When insulating your attic, you have several options. One of them is blown-in-blanket insulation. Attics equipped with this form of insulation provide better thermal efficiency.

Blown-in-blanket insulation is eco-friendly, using fiberglass manufactured with 40 percent to 60 percent recycled glass. BIBS offers improved thermal efficiency because the process fills voids and gaps easily and fully. Installed the right way, this type of fiberglass insulation will help you stay warm while you work in your studio during winter and allow you to save money on heating costs.

BIBS also comes with other benefits:

  • Improved Safety – This type of insulation is naturally fire-resistant.
  • Resistant to Moisture – Blown-in-blanket insulation prevents moisture that may encourage the growth of mildew and mold.
  • Resistant to Pests – This insulation material does not serve as a source of food or a breeding ground for rats, insects, and other critters.
  • Reduced Noise – BIBS allows your art studio to stay quiet and private. You could produce masterpieces without worrying about noise from outside your home or the neighboring rooms.

Another option you could consider is spray foam insulation. This material is one of the best from a performance standpoint.

Some advantages of this type of insulation are:

  • Superior Air Leakage Prevention – The insulation material expands quickly to create airtight seals on cracks, cavities, and holes. Spray foam also helps prevent the spread of airborne contaminants.
  • Minimal Maintenance – This type of insulation retains its shape and condition even under severe temperature increases or drops. You won’t have to worry about conducting periodic maintenance.

7. Hire an Electrician to Wire Your Attic

Adding electrical wires and other components of your attic is a job left to professionals. Taking a DIY approach on this task is dangerous, as you could increase your risk of starting electrical fires due to improper wiring installation.

8. Construct a Subfloor

fiberglass-insulation

A subfloor refers to stiff grid of boards that support the flooring in your attic. You’ll need to make this structure if joists are present in the attic.

Building a subfloor involves several steps, including:

  • Marking chalk lines on all the attic joists
  • Laying plywood sheets strategically (or oriented strand board sheets if you find plywood to be too costly)
  • Securing the plywood by drilling screws
  • Installing and securing additional sheets until you successfully cover the entire attic floor
  • Caulking all the screw heads and seams

If you’re not sure how to execute this project, get a general contractor to complete the work for you.

9. Install Drywall

Drywall, also known as gypsum, is a fire-resistant material used to cover bare stud walls. This structure helps maintain the temperature in your attic and makes your personal space look more attractive.

Installing a drywall in an attic is a two-person job. You’ll need assistance measuring, hanging, and securing drywall on both the ceiling and the walls. If you can’t find a partner to help you, look for a team of contractors to install gypsum on your attic.

10. Paint the Attic

Painting breathes life to your attic and soon-to-be art studio. When painting this area of your house, use at least two coats of paint. This will give your drywall a finished, polished appearance.

When choosing paint colors, choose combinations that work well in your studio. If you want maximum illumination, for instance, opt for off-white colors for the ceiling and walls.  The light from the electrical fixtures and the window will bounce off the surfaces and produce reflected and ambient illumination. This results in a cheery and well-lit workspace for your studio.

Alternatively, select paint colors that you’d love seeing every day. After all, you’re going to be working in your art studio regularly. You may as well create a personally pleasing space that motivates you to get your work done.

11. Decorate Your New Art Studio

Once the construction and installation procedures are complete, the only thing left to do is to decorate your new studio.

How you decorate your new personal space is up to you. One suggestion is to add quality carpeting to the attic. This helps minimize sound, especially if you need keep your studio as quiet as possible. Carpeting also adds extra insulation to your floor. Apart from that, you could add accessories or statement posters that help inspire you to create your next grand masterpiece.

Let A+ Insulation Take Care of Your Insulation Needs

aircon

Attic insulation is a home improvement project best left to A+ Insulation. Insulating your attic, along with other areas of your home, is what we know and do best.

When we install insulation in your attic, our licensed, bonded, and insured insulation specialists in Kansas City carry out efficient and diligent work.  We complete the project within your allocated budget and on schedule. We also follow strict local building codes to keep you safe and help you to enjoy consistent temperatures in your attic.

What sets us our company from other service provider is the level of service we deliver to our valued customers. We go beyond installing quality insulation material in your home. Our team wants you to feel satisfied on all aspects of our insulation job, including the home evaluation, cleanup, price, and workmanship.

We make sure that our job from start to finish is A+, the grade we strive to achieve on every insulation project.

Arrange an appointment with us today and have one of our energy consultants perform a free, no-obligation home energy assessment.

Steps to Turning Your Unused Attic Into Your Dream Library

If you’re looking to optimize your current space, transform your unused attic into a dream home library. Give yourself and your family a reader’s retreat, a place perfect for learning and relaxation.

We’ll break down the features and the steps to converting your attic into a library:

The attic should be building code compliant

When converting an attic into a living space, it must meet requirements set by the building code, like any other living area in your house.

Overall floor space

  • Floor space: The attic should have a minimum of 70-sq ft of floor space.
  • Floor dimension: It should have a floor space of at least 7 ft starting from the center. The reason behind this is to prevent homeowners from occupying strangely configured spaces. If you have a 70-sq ft attic space with a 4-ft x 17.50-ft dimension, it will not be code-compliant.
  • Ceiling height: At least 50 percent of usable floor space should have a ceiling height of 7.50-ft or more so owners can stand up comfortably with enough headroom.

Accessibility

Note that both fixed ladders and pull-down ladders aren’t code-compliant stairs for an attic. If your attic doesn’t have a staircase, your design will require one. According to the building code, an attic staircase must:

  • Provide a minimum of 6-ft 8-in of headroom in its entire length.
  • An individual stair must be at least 36-in wide.
  • Treads must be at least 9-in deep.
  • Risers should be no more than 8 1/4-in high.

Secondary egress

Attics can be the worst place to be in during a fire because heat can rise rapidly; that’s why it’s necessary to have a secondary exit. Attic egress openings must:

  • Have a minimum net opening area of at least 5.70-sq ft.
  • Have a height of not more than 44-in above the attic floor level.
  • Have a minimum opening height of at least 24-in.
  • Have a minimum opening width of at least 20-in.

Roof frame

Most roofs are framed either using trusses or rafters.

  • Trusses aren’t ideal for converted attics because it’s hard to get that needed walkable open space.
  • Rafters provide a better attic environment because of the clear space they provide below the frame.

You can go to your local permitting office to get a permit for your attic renovation. Usually, permits are needed only when there’s a need to alter electrical wirings or ventilation or if the renovation will affect the overall structural integrity of the house.

Start building your dream home library

Top-to-bottom attic renovation, unless you’re a handyman, is rarely a DIY project. Be realistic about your skill level when planning to do all the work yourself. Hire a professional for the renovation, especially if this is your first time to remodel.

Check the roof for leaks

The attic is the spot in your house that’s most likely to suffer from moisture infiltration. Moisture can cause substantial damage to wooden shelves and books.

  • Ensure that the roof is completely water-proof. Apply a waterproofing compound to prevent the penetration of moisture in the roofing material.
  • Check the walls for moisture. Mold and mildew thrive in moisture-filled, humid walls.

Minor roof repairs can cost from $150 to $400; $400 to $1,000 for moderate repairs; while $1,000 to $3,000 for major repairs.

Proper insulation

The temperature in a standard library should be around 70°F (21°C) and the room should have a relative humidity of between 30-50%. Fluctuations in temperature and relative humidity may contribute significantly to the deterioration of books and other archival materials. The damage may include cockling paper, flaking ink, warped book covers and cracked emulsion on photographs.

Attic insulations maintain the desired temperature in the attic. Consider the following insulation methods:

  • Wall insulation – This seals gaps in walls effectively, ensuring stud widths are snug tight. This keeps outside temperatures at bay.
  • Spray foam insulation – This guarantees there will be no gaps where indoor air can escape, as the constant exchange of air between inside and outside the home can lead to high energy bills.

library

Attic wiring

An electrician should check if all the wiring installations meet building code requirements. Doing this without the guidance and advice of a professional increases the risk of electrical breakdown and fires. Your electrician will install electrical wiring across the walls and the ceiling, with one outlet available for each wall.

If your attic doesn’t have existing ductwork, you’ll need to find out whether your current HVAC system will be able to support a new room.

Thick subfloor

You can only proceed with subflooring once all electrical, ventilation and insulation installations are finished. If wood joists are visible on your attic floor, you will need a subfloor.

Choose a thicker subfloor panel to reduce the sound coming from the room below the attic. You can also add an insulation layer beneath the subfloor.

Inspiring wall color

You can start now with the decorating part. Since your home library will be your sanctuary for relaxation, go with inspiring and soothing hues.

  • Neutral colors like ivory, light blue, light purple and muted colors of green will create a soothing ambiance.
  • Warm neutral colors (light shades of brown and grey) will make the attic cozy and will give the library a cocoon-like effect.
  • Pure white walls will give a Scandinavian-inspired feel.
  • Black walls will result in a sophisticated, upscale finish.

More vibrant shades can be used for a few accent details to spark creativity and imagination. Avoid bright colors that invigorate, like sunny yellow, bold fuschia, bright orange and lime green. If these hues are your favorites, you can tone down and substitute with mellow gold, pumpkin, warm berry or olive green.

Reading nook

Pick a special corner that will serve as your reading nook. Place your favorite chair or couch, and hang select art pieces for inspiration. Surround the space with more shelves and cozy furniture.

Bookshelves

Bookshelves are the key ingredients to turning your attic into a full-fledged library. When choosing your bookshelves, go with those that will give maximum functionality and storage space.

  • Traditional bookshelves are made from wood and come with classic features like crown molding, built-in lighting and picture frame doors. You can stain them to match your home library’s design.
  • Modern and minimalist bookshelves have wooden and metal accents.
  • Built-in shelves and floating shelves have become more popular in modern homes. They have a sleek design, saving on floor space. They can store everything from books, pictures to CDs.

How much would it cost to convert an attic into a library?

According to Home Advisor, the average cost of attic conversions is $50,000. Here’s a breakdown of the cost (note that the costs are rough averages):

  • Windows – $2,200 for a five-window installation.
  • Dormers – $1,800 for a DIY dormer installation; $2,500 to $20,000 for professional installation.
  • Heating and cooling – $1,000 for duct and vent installations; $4,000 for a furnace installation; $300 for a window air conditioner; $150 to $200 for an electric baseboard heater; $500 to $1,600 for an attic fan installation.
  • Stairs – $2,200 to $3,100 for a professional staircase installation.
  • Walls – $1,900 for a professional wall installation; $1,600 for a drywall installation; $500 for a typical wallpaper.
  • Ceiling – $1,600 for a professional ceiling installation.
  • Flooring – $4,400 for hardwood; $1,500 for carpet; $ $2,800 for laminate flooring; $1,600 for ceramic or porcelain tile.
  • Lighting – $50 to $200 for recessed lighting; $90 to $220 for ceiling-mounted lights; $90 to $230 for wall lights.
  • Electricity – $1,300 to $3,000 for new electrical panel installation; $50 to $100 an hour for the service of a licensed electrician.
  • Plumbing – $1,000 for plumbing installations.
  • Bookshelves – $2,500 for a standard built-in bookshelf; $1,250 to $4,000 for a customized bookshelf.
  • Chairs and couches – $300 to $1,000 for upholstered furniture.

home library

Why have a library at home?

A child growing up in a home with at least 80 books has a higher chance of developing greater literacy and numeracy in adulthood. The study found that high school students who are exposed to a wide selection of books can become as literate, numerate and technologically bright as college graduates who grew up with only a few books.

Another study found that growing up in a home with 500 books could propel a child up to 3.2 years further in education.

Fun fact: Scandinavian families (Norwegians, Swedes) have the biggest book collections, with a minimum of 500 books in their homes. Chile, Italy, Turkey, Greece and Singapore are the only countries with homes having 80 books or fewer.

A home library is an excellent investment for your child’s future. Reading at home can improve your child’s reading and math skills, potentially eliminating the need for additional classes. Lastly, a child who grew up in a family rich in books is 19% more likely to finish college than a child who didn’t.

Trust A+ Insulation for your attic’s insulation needs

Did you know that an under-insulated house can lose between 20 and 30 percent of its energy? Trust your insulation needs to us at A+ Insulation. When it comes to insulation, we’re the experts to answer all your needs. We’ve been insulating homes and businesses in the Kansas City area since 2004.

Our spray foam method has been proven to reduce energy loss and lower electricity bills. Because it’s made of foam, it expands to fill entire holes, leaving no gaps in your walls. Feel free to request a quote or call us today for more information.

Beyond Insulation: Ensuring Proper Ventilation in Your Attic

If you live in an old home, it will likely have insulation but lack ventilation in its attic. Placing insulation in your attic is important; it helps to regulate the temperature by making your home warmer in winter and cooler in summer. But your attic also needs proper ventilation.

A+ Insulation explains why ventilation for your attic is necessary, and how you can install it.

If your attic doesn’t have proper ventilation, the insulation will be useless. There are a couple of things that could happen to your insulation, and the effects depend on the seasons.

The Effects of an Unventilated Attic in Winter

ventilationDuring winter, warm, moist air rises from the rooms. This air gets trapped in the attic, warming the roof. When cooler air enters the attic, condensation occurs, which then creates mold or wood rot, and cause serious damage to the roof and ceiling supports. The insulation could then become soiled, rendering it useless in helping keep the house warm.

Another problem arises when snow accumulates on your roof, and the warmer air in the attic melts the snow. Snowmelt then flows down to your roof’s gutters and re-freezes at the bottom of your roof. Over the course of the day, more and more snow melts, trickles down to the edges and re-freezes. When this happens enough times, the ice can eventually crack open the bottom shingles of your roof, channeling snowmelt to your attic, and also affecting the insulation.

The Effects of an Unventilated Attic in Summer

In summer, heat may build up in the roof’s base over the course of a day, making the temperature in the attic and the home as high as the outside temp, or higher. This phenomenon is called solar gain. What this does is create a musty smell, caused by overheated felt undersarking or other insulating material. The stored heat likewise renders the insulation useless, and the heat is radiated back into the lower rooms and spaces in the house.

The Consequences

High Heating/Cooling Costs – With an unventilated attic in winter, room temperatures could drop considerably and you will have to turn up the heat. In summer, room temperatures could rise and you will have to turn up the A/C, or you may be forced to move to cooler environs, especially in hot, humid evenings. Either way, an unventilated attic can mean significantly higher heating or cooling bills.

Destroys Energy Efficiency – Another consequence is that the resulting inefficiency will undermine any efforts to increase your home’s value. You can invest as much as you want in a new HVAC system, energy-efficient windows (which cost anywhere from $8,000 to $24,000), or better insulation, but if the attic remains unventilated, the money you invest in energy-efficient measures will simply go to waste. Note that it will only cost you about $369 to $879 to ventilate your attic.

Allergic Reactions – You may not be aware, but a poorly ventilated attic can indirectly trigger allergies, and in some cases even get into yours or your kids’ lungs, causing an asthma attack. This happens when the air becomes humid during the warmer months, causing condensation in your attic. Since there’s no ventilation, the water droplets don’t dry up, creating the perfect environment in your attic for mold and mildew. As humid air continues to be trapped in your unventilated attic, mold and mildew continue to grow. Mold is present everywhere, and that’s what usually triggers allergies apart from dust or pollen.

The next time you venture into your poorly or unventilated attic, you may accidentally release mold spores and cause them to spread throughout your home, triggering yours or your family members’ allergies or asthma attacks. Should your attic remain insufficiently ventilated and mold is left to grow, you could face steep hospital bills for allergy tests, or pay as much as $3,266 yearly for a family member’s asthma medicine. These costs might have to come out of your pocket, as they aren’t always covered by medical insurance.

Expensive Roof Damage

Apart from letting mold and mildew grow and trigger health issues, an insufficiently-ventilated attic can damage your roof. Without a proper exhaust for hot air and intake for cooler air during summer, the warm air can accumulate in your attic. Roof shingles may become warped or deteriorate from the extreme heat, making your roof unsightly or causing expensive repairs. If your roof becomes warped due to the heat, expect to pay $150 to $400 for minor damage, and $1,000 to $3,000 for major repairs.

During winter, an attic with insufficient ventilation can form ice dams at the bottom edge of the roof shingles. A freeze-thaw cycle ensues, caused by the differences in indoor and outdoor temperatures, which then bend and break the shingles. Ice dams can also put huge stress on the roofing structure. Without proper attic ventilation, minor damage can range from $100 to $300. If the damage becomes serious and requires the entire roof to be replaced, this can cost $4,000 to $20,000 for an entirely new roof.

So how do you fix the situation? First, don’t jump the gun and immediately assume you need a drastic overhaul to your attic, and cram it with ventilation. Check first if your attic is in serious need of ventilation.

ventilationHow to Know If Your Attic Needs Better Ventilation

While considerable differences between the temperatures inside and outside your home don’t always point to needing a better-ventilated attic, there are other ways to determine this. Here are four ways to determine if your attic is unventilated or if it needs better ventilation:

  1. Inspect your roof and the eaves. If there aren’t any attic vents on either of them, then you definitely should have some installed. Your roof may already have a ridge vent, which is a continuous air vent that runs along the roof’s peak. If no ridge vent is visible, look for a gable vent. These are louvered openings on the top of roof gables.
  2. Feel the ceilings. If on a warm, sunny day, your ceilings feel hot to the touch, this means your attic is acting like a solar oven. Without ventilation or with insufficient ventilation, the attic will likely build up heat and cook your roof’s shingles. This will surely raise your cooling bills.
  3. Inspect the eaves for thick ridges of ice. When winter comes, check your eaves for a buildup of thick ice known as ice dams. They are a sure sign that the ventilation in your attic is either insufficient or nonexistent.
  4. Check for dampness or frost. In winter, go up to your attic and inspect the beams and supports for dampness or ice formation. The warm air that rises from the lower rooms contains moisture, and it’s bound to condense when it comes in contact with the cooler attic. If the condensation or frost is severe, your attic might not be allowing any air to flow back outside.

How to Determine the Number of Vents You Need

Now that you know your attic lacks the necessary ventilation, how do you determine the number of roof vents your attic needs? First, compute for the square footage of your attic by multiplying its length by its width. For example, if your attic is 40 ft. by 50 ft., its area is 2,000 square feet.

Aim for the ideal of 1 square foot (144 square inches) of ventilation opening for every 150 square feet of the attic. Most building codes only require half that many vents, but the more attic vents you install, the better. If your attic has an area of 2,000 square feet, then 2,000 divided by 150 is 13.3, so you’ll need 6-7 vents (13.33 divided by 2= 6.7) installed onto your roof to ventilate the attic. 

Vent Installation

To ventilate your attic, it’s best to hire professional insulation contractors in Kansas City. They can better assess the number and size of vents you need to have installed in your attic to maximize the cooling and heating efficiency of your home’s insulation. What’s more, you avoid doing any hard labor or get into any accidents when you hire pros to do the job. They already have the experience, expertise, and equipment to install your attic vents safely and efficiently. All you need to do is sit back and wait for your new vents to be installed.

Did you find this article useful? If your attic needs ventilation or you want to learn more about our other services, contact us today. We look forward to working on your problem and providing you A+ service!

Structural Damage to Attics and Other Problems Rodents Cause

atticIf there’s one room in the house most homeowners give little thought to, it’s probably the attic. When it’s too small to use as a bedroom, it’s used as long-term storage space for seasonal clothes, sports equipment, childhood memorabilia, and other things that often takes us years to throw away like old furniture, toys, and books. Weeks, maybe even months, could go by before someone else visits the attic, which explains why it often becomes a nesting ground for pests — rodents in particular.

Rodents’ Love Affair with Attics

Rodents are America’s biggest home pest concern. A representative from the National Pest Management Association adds that they are very adept at surviving, hence their propensity for entering households and residing in attics where they thrive with little disturbance.

Attics are attractive to mice and rats because they provide shelter and protection from the elements. The insulating material, cords, and pipes that often line an attic further create conducive living conditions for rodents. They can burrow through insulation foam, build nests for their young, gather and stockpile food without being interrupted by preying animals or humans.

Unfortunately, many homeowners don’t realize that they have rodents in the attic until it’s too late. It’s tough dealing with pests when they’ve taken up residence in your home for a long time or already multiplied.

A few crucial facts about rodents:

  • Female mice can have 12 litters of three to 12 pups per year.
  • Female rats can have eight litters of two to 14 pups per year.
  • The gestation period for mice is 18 days; 21 days for rats.
  • Rodents’ life span is between nine to 18 months.

Given these, it’s crucial to eliminate rodents from your roof as quickly as possible.

Signs of a Rodent Infestation in the Attic

atticRodents are pretty good at staying out of sight, but they leave distinctive trails. Observe your surroundings and watch out for the following:

  • Scurrying noises on the roof and inside the walls (especially at night, since rats and mice are nocturnal creatures).
  • Inexplicable crumbs and wood chips or stuffing on floor corners and inside pantry cabinets and utility closets.
  • Growing holes in the walls, particularly at the corners of the crown and floor moldings.
  • Gnaw marks on wood surfaces.
  • Gnaw marks on food packs and carton boxes.
  • Visible grease marks (house mice have oily fur from burrowing through all kinds of filthy holes and surfaces).
  • Expanding gaps between the molding panels and the floor or wall.
  • Dark brown or black grains about a quarter to 3/4 of an inch long (mice and rat droppings) litter the exposed upper shelves and utility closets.
  • The attic becomes increasingly drafty.
  • A musty, pungent smell permeates the entire house.

Ignoring these signs can result in substantial damage to your attic, and probably elsewhere in your home.

Kinds of Damage Caused by Rodents

Rodents’ claws and teeth may be tiny, but they are sharp and strong enough to go through pretty much everything except for glass and metals. They can chew on:

  • wood
  • concrete
  • aluminum siding
  • plaster
  • soil
  • frozen ground

Seeing as these are the very materials houses are made of, it would make sense to say that no home is rodent infestation-proof. These creatures can inflict all kinds of structural damage, but let’s focus first on what they can do to attics.

  1. Destroy insulation panels – Rodents are notorious for creating nests. Unfortunately for homeowners, loose-fill and batt insulation are perfect nesting materials. They’re often the first casualties in attics with exposed insulation panels, as a result. Rats tear the material apart to assemble nests for their pups. Meanwhile, mice tend to burrow and form tunnels within the insulation panels.
  2. Gnaw holes in the rafters – The structural damage in attics stems from rodents’ determination to go through the tiniest holes to enter a house. It doesn’t matter if an entrance is too tiny; they will just keep chewing on the wood or plaster until they can fit through the hole. They also do the same to get past the attic and explore other areas of the building to search for food.
  3. Filthy stains – As mentioned earlier, rats and most species of house mice have furry or hairy underbellies that accumulate grease and filth as they travel. These stains are an eyesore and could be a problem when it’s time to sell the house. These marks are a dead giveaway that the house is prone to rodent infestation — a red flag that savvy house buyers are sure to catch.
  4. Damaged soffits and fascia – Apart from the insulation panels, the tiny, cozy space created by the soffit and fascia is also a haven for rodents. In the absence of insulated rafters and floors, rodents might gnaw their way into these spaces to build their nests. Their prolonged presence would inevitably result in debris, feces, and urine residue buildup. Soffits and fascias are made of wood, which can deteriorate rapidly with constant exposure to fecal matter and rodent activity.
  5. Cut electrical wiring – Rodents chew on wires with just as much gusto as anything else they can sink their teeth into. The damage may not be structural, but it is potentially deadly. Damaged electrical wiring can cause connected appliances to short-circuit or generate heat in areas where thermal energy shouldn’t be. Once rodents start chewing on wires, a house’s fire risk increases substantially.

Any of these can give a homeowner a massive headache. The problems don’t end with these five, however. Each of them can lead to more attic damage and other issues that could put residents’ health at risk.

Secondary Problems

Imagine how things would be after an attic is overrun by rodents:

The insulation panels would be in shambles. The wooden rafters, soffits, and fascias would be gnawed in many places, their structural integrity getting weaker the bigger and more numerous the holes become. Rubber-coated cables would be chipped in random places, the copper strands exposed if not completely cut.

Homeowners can expect that other structural and health problems will emerge from this scenario:

  1. Faulty gutters – Gutter systems are often mounted next to the fascias of the roof. Fascia boards weakened by structural damage, and moisture could give way under the weight of PVC pipes, leaf grates, and mounting brackets. Another scenario could be chunks of rotting fascia that would fall in and clog gutter lines. It can happen with exposed, half-round gutters with a drip edge that’s screwed directly onto the fascia board.
  2. Water damage – Leaky gutters can let water seep into the rafters and eaves, adding water damage to the structural problems of an attic. A host of other issues could follow this:
  • Mold and mildew growth
  • Discoloration on the interior walls and the ceiling of the floor below
  • Compromised roof integrity
  1. Ineffective home insulation – The R-value of a house’s insulation system deteriorates the moment rodents make themselves at home in an insulated attic. Insulating material must be seamless to be effective. Gaps in blanket insulation or loose-fill insulation become leak points through which hot air can escape. Air leaks can add 10-20% to your annual heating and cooling bills (the US Department of Energy estimates this to be around $83-166).
  2. More pests – A rodent colony inside a house can attract a specific type of predatory pest: snakes. These slithering creatures have an uncanny knack for tracking rodents’ nests, and they can do it right under people’s noses. In fact, many homeowners report finding snakes curled up in the crevices of heat-generating appliances like old refrigerators, boiler tanks, and spin dryers, oblivious to their surroundings after eating their fill. Snakes might be useful in eliminating rodents, but they’re not the kind of help people should want to get.

Other pests like roaches, woodlice, and termites could also make their way inside a home thanks to the holes and burrows rodents create.

  1. Poor air quality – The smell of rodent excrement and mold growth are distracting at best and a health risk at worst. Feces and urine can contaminate the air as rodents have no compunction where and when they will defecate. Mold growth, meanwhile, can trigger respiratory illnesses, especially among infants. People who don’t have a family history of asthma, pneumonia, or other respiratory diseases can become vulnerable to them with enough prolonged exposure to poor–quality air.

A PSA for Insulate Kansas City Customers

It’s remarkable how such tiny creatures can cause so much damage to a house and put human lives at risk. We hope to increase people’s awareness about the possible effects of rodent infestation mainly because these pests compromise home insulation — a major concern for us given that we provide and install home insulation materials.

Insulate Kansas City delivers quality products and services, and we want our customers to experience their full benefits. A rodent problem will no doubt get in the way of that. Moreover, the structural damage rodents can do to an attic (and an entire house for that matter) can be extensive and expensive.

Avoid having to spend for premature insulation replacement and structural repairs; bear in mind the signs of a rodent infestation and eliminate the pests before they can do the kinds of damage listed in this article. But, if rodents have gotten into the insulation in your attic, contact Insulate Kansas City. We’ll immediately work on restoring the insulation in your roof.

Fiberglass vs. Cellulose: Which Works Best as a Blow-In Insulation Material?

Worker insulating the wallAccording to the United States Environmental Protection Agency (US EPA), homeowners can save an average of 11% on total energy costs by air sealing their homes and adding insulation in attics and basements. One way to do this is through blow-in insulation. This is when loose-fill material is blown into your attic through a hose, using a truck-mounted or portable machine. This method of adding insulation is used both for new constructions and existing attics.

There are many kinds of insulation that you can use in your home’s attic, walls, and basements, but the two most common and least expensive are fiberglass and cellulose. Both materials improve your home’s energy efficiency but do so in different ways.

Here are some of the differences between the two insulation materials, so that you can make an informed decision on which one is best for your home.

Cost

Though, of course, the prices vary from contractor to contractor, fiberglass, and cellulose are generally inexpensive. They are the cheapest insulation options available in the market today. The difference between their prices is negligible.

R-Value

R-Value is the measurement of an insulation material’s ability to block thermal transfer or the movement of heat. The higher the R-value, the more insulative the material. Fiberglass and cellulose have similar R-values when installed properly. If so, they perform usually at the 3.5 to 3.7 range. This can still vary based on a lot of other factors, such as wind-washing, settling, or outside temperature, however.

Air Leakage

Both fiberglass and cellulose help retain heat but neither acts as an air barrier. Air can circulate through the insulation. Fiberglass traps air in the pockets of the insulation, while, cellulose can slow air flow, particularly in walls.

Moisture

Neither insulation material works well when wet or damp. This is because both of them are fibrous, which means they easily trap moisture. However, both can also dry out very quickly because of their high air permeability.

Flammability

Fiberglass and cellulose have different issues with fire. Since fiberglass is made of spun glass, it won’t burn; when faced with extreme heat, it will simply melt. Blow-in fiberglass is completely non-flammable.

On the other hand, cellulose insulation is made of ground-up paper. Though this paper is treated with flame retardants, there is still a possibility that it would catch fire around recessed lighting and in extreme heat.

Durability

Both cellulose and fiberglass are quite durable. While cellulose is treated to help prevent rot, mildew, and decay, fiberglass simply does not rot, nor does it promote mildew or decay. Excessive moisture may cause both to develop these issues, however.

Which Will You Pick?

Choosing the insulation material largely depends on the project at hand. Fiberglass and cellulose have their own pros and cons, and each works differently in distinct applications.

If you opt for blow-in blanket insulation in Kansas City, get in touch with A+ Insulation. We have been insulating homes and businesses in Kansas City since 2004. Our team of experts would love to hear from you and discuss all available options. Contact us today!

Add Resale Value to Your KC Home with Insulation

Want to add more value to your Kansas City home? Start by insulating your home properly with A+ Insulation. This simple addition can drastically add value to your home immediately in the form of lower utility bills and later when you decide to put it on the market. Here’s what you need to know about insulating your home, and why it’s a great investment to make.

The Insulation Standards Are Changing

Insulation standards are not what they were a few years ago. Cities and towns within the Kansas City metro are raising the R-Value that your insulation has to meet in the 2015 calendar year. (R-Value is the capacity of your insulation to resist heat flow.) This means new homes, or homes for sale, need to have insulation with acceptable R-Values. The upside to this is that it will mean more energy efficient homes. The higher the R-Value of your insulation, the more savings you’ll see when it comes to your monthly utility bill.

See all the types of insulation that can add value to your home on our website.

ROI of Insulating Your Home

The return on your investment is huge when it comes to insulating your home. Attic insulation is one of the most important types to have in a Midwestern home. This type of insulation can pay for itself in just two years based on energy savings. In this amount of time you can save an average of $1,000 in energy savings. Take it from Mike O’Hara, the owner of A+ Insulation who says, “Updating your home’s insulation is a financially responsible decision.” Since insulation is responsible for up to 70% of the total heat gain and loss in your home, the proper type, amount, and installation of insulation can make a huge difference in your savings in the longterm.

Call A+ Insulation at (913) 281-2250 or (816) 268-7511 to increase the value of your home with new insulation.

3 Reasons to Hire a Professional Insulation Company & Avoid DIY

Professional Insulation vs diyWhen it comes to insulation, it really is best to leave it to the professionals. DIY projects are okay for holiday displays and side tables, but when it comes to something as important as insulation, you really should think twice before you take it on yourself. Here are three major reasons why we suggest you call the insulation experts at A+ Insulation first.

R-Value of Your Insulation

Insulation installed by the professionals is more effective at doing its job for many reasons. One very important reason is that professionally installed insulation usually has a higher R-value. R-value is a measure of resistance to heat flow through a given thickness of material. The higher the R-value of insulation, the more resistant it is to temperature fluctuation. In short, higher R-values mean the insulation does a better job at insulating your home. Without the proper practices, self-installation on insulation can lead to higher energy bills, undermining one of the main purposes of insulating your home in the first place.

Insufficient Insulation

Often times, when homeowners try to insulate their homes themselves they underestimate the amount of insulation needed to effectively insulate their home. We often fine wall cavities or attics that aren’t sufficiently filled when homeowners install it themselves. When this happens you’ll probably find your energy bills are higher than they would be if your home was properly insulated.

Poor Quality Insulation Equipment

The type of equipment used to install insulation can also affect its effectiveness. Many DIY-ers rent insulation equipment from home improvement stores, and many of these equipment pieces don’t have the capacity to do the job right. The quality of rented insulation equipment is usually lower, and the technology is older. We often find that rented equipment doesn’t properly break up product to give you the R-value you want. Sometimes we even find that untrained people using rented equipment damage the sheetrock in their homes. Professional insulation technicians are well trained on the best practices and with the newest and most effective technologies.

Read more about how properly installed insulation can help you save.

Call A+ Insulation today at (913) 281-2250 or (816) 268-7511 to get a free insulation quote for your Kansas City area home.

Attic Insulation: What to Expect from A+ Insulation

Insulating your attic is a big project, but at A+ Insulation we try to make sure it doesn’t interrupt your day-to-day life. Many Kansas City homeowners aren’t sure what to expect when they hire us to do the job. Here’s a quick rundown of what a typical attic insulation job looks like for A+ Insulation.

We Protect Your Home First

First and foremost, we understand that your home is the priority. That’s why we make sure to care for your entire home when we arrive to do a job. We lay down plastic all the way from the front door of your home to the attic entrance. We do this to block off the rest of your home from the work zone, and to make sure we stay within our work zone. This keeps outside interferences to a minimum, and keeps us from tracking dirt, leaves and insulation into other parts of your home. Blocking off the work zone also allows you to carry on with your normal activities while we do our work. We try our best to be non-intrusive, so you don’t even have to leave your home.

We Clean Up Afterwards

We take out time in your attic and make sure we cover everything on our list. Even still, a typical job usually only takes four to six hours to complete. After we finish installing the insulation, though, our job still isn’t done. We never leave a home without cleaning up our workspace. We make sure to remove the plastic coverings, and vacuum the entire route before we leave. Our goal is to leave your home looking and feeling even better than before we got there.

Don’t just take our word for it, read what KC homeowners are saying about their personal experience with A+!

Call us at (913) 281-2250 or (816) 268-7511 to schedule an estimate to insulate your attic with A+ Insulation today.

4 Attic Insulation Options for Your KC Home

Don’t wait to insulate your attic. With the severe Kansas City area weather, attic insulation is one of the most important factors in keeping your home comfortable. At A+ Insulation, we want you to be educated on the facts about the different types of attic insulation and which one is best for your home.

InsulSafe SP

This fiberglass blown-in insulation is commonly used in attics and walls. It has superior thermal efficiency, as well as great coverage, sound absorption, and it’s non-combustible. It’s a popular choice, with 80% of A+ Insulation customers choosing to install it in their homes. Our owner, Mike O’Hara, even has it in his home. InsulSafe comes with a lifetime transferrable warranty.

Cellulose

Cellulose is also a blown-in insulation. It’s different from other insulation, however, as it acts similar to a liquid when it is applied, wrapping itself around obstructions and filling nooks and crannies that batt insulation can’t. It’s almost like a blanket around the inside of your home. Cellulose also has amazing thermal efficiency, keeping your home more comfortable no matter the weather. Many homeowners choose cellulose insulation because it is more environmentally friendly than many other options.

Spray Foam

We like to use CertaSpray closed cell foam insulation, which expands up to 100 times its original size to fill even the smallest, hard-to-get-to spaces. This insulation is great because it also acts as an air sealing system.

Batted

This is one of the most affordable insulation solutions. The downside is that it’s best for areas without a lot of pipes, wires, or other obstructions. Since many of these things require cutting the insulation to fit, it can cause gaps which can negatively affect the insulation’s ability to do its job.

When you choose A+ Insulation, we can show you samples of the product, and even offer a thermal imaging scan of your attic.  We review your current situation and offer improvements that we believe would be best for your home.

Call A+ Insulation today at (913) 281-2250 or (816) 268-7511 to talk about which type of insulation is the right solution for your home.

Insulate Your Kansas City Home Now to Avoid Problems Later

Don’t wait until you get a huge energy bill in December to call us this year. Get ahead of the curve and call A+ Insulation to install insulation in your home today. Not only will you avoid a high energy bill, but you’ll also beat our busy season, and save yourself damage to your home due to inadequate insulation.

Quicker Insulation Service

By calling us this fall, we will be able to provide you with a more efficient turnaround of insulation services. After the first really cold month hits, and homeowners see their energy bills, we receive a surge of phone calls for our insulation services. Beat the rush and make sure your home is properly insulated before the holidays. You’ll save yourself a lot of hassle.

Related Read: How to Know When Your Home Is Under Insulated

Avoid Home Damage

Another major reason you should install insulation in your home now is to avoid damage to your home that is cause by inadequate insulation. Not only does insulation keep your home more comfortable inside and lower your energy bills, but it also protects your home from damage caused by Kansas City’s melting and freezing snow and ice. Improper insulation in your attic can cause heat to escape through your roof. In the winter this can melt snow and ice, which then freezes again as it flows to the lower parts of your roof and gutters. The result is large chunks of ice and oversized icicles hanging from your eaves. We call this ice damming. It can wreak havoc on your roof and your gutter. Not to mention it can turn into a safety hazard for those below. And if you don’t have enough insulation in your exterior walls, you could also experience frozen pipes, which can burst, causing thousands of dollars worth of damage instantaneously.

Call A+ Insulation today at (913) 281-2250 or (816) 268-7511 to get started insulating your home now.